Mobile Ticketing Guide

Mobile Ticketing Guide

Access, store & manage your tickets

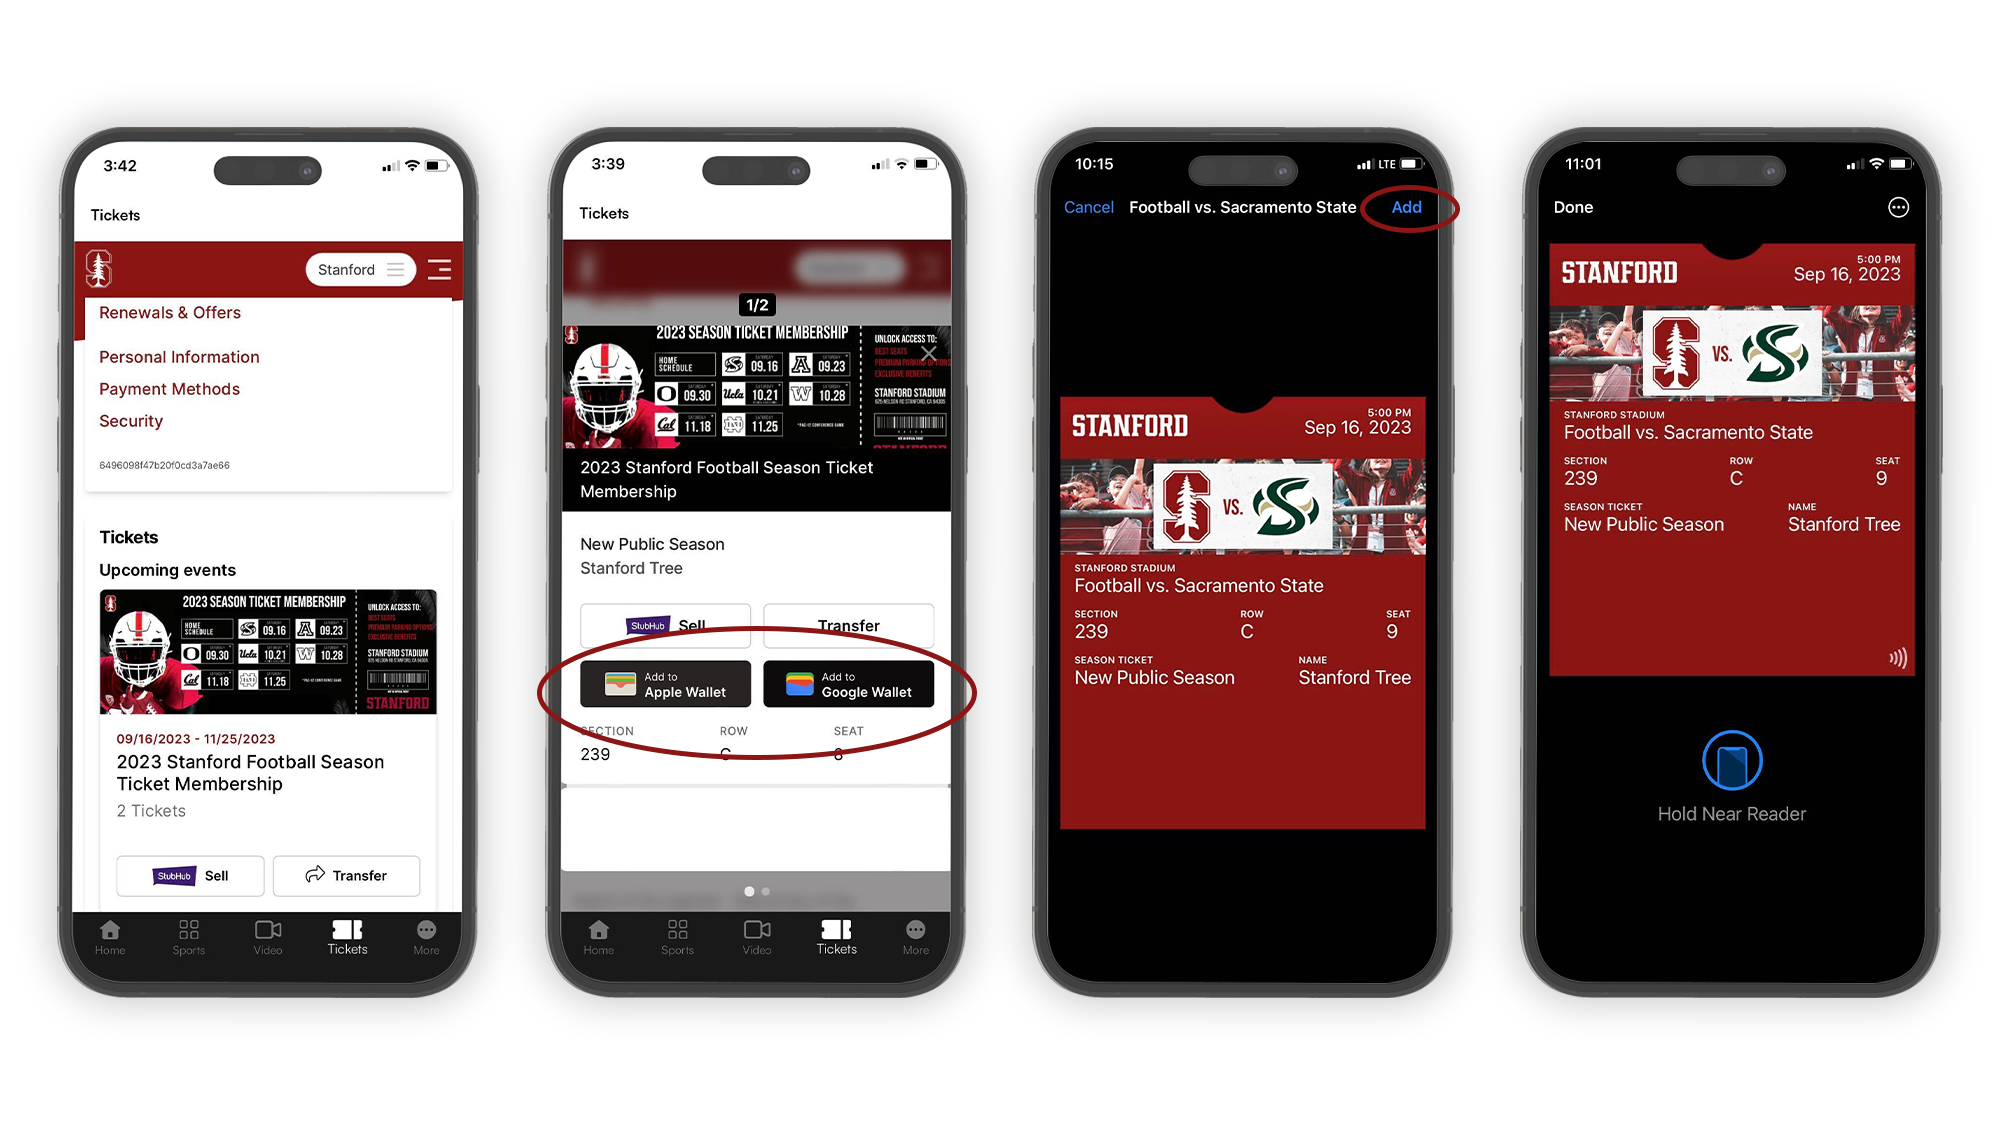
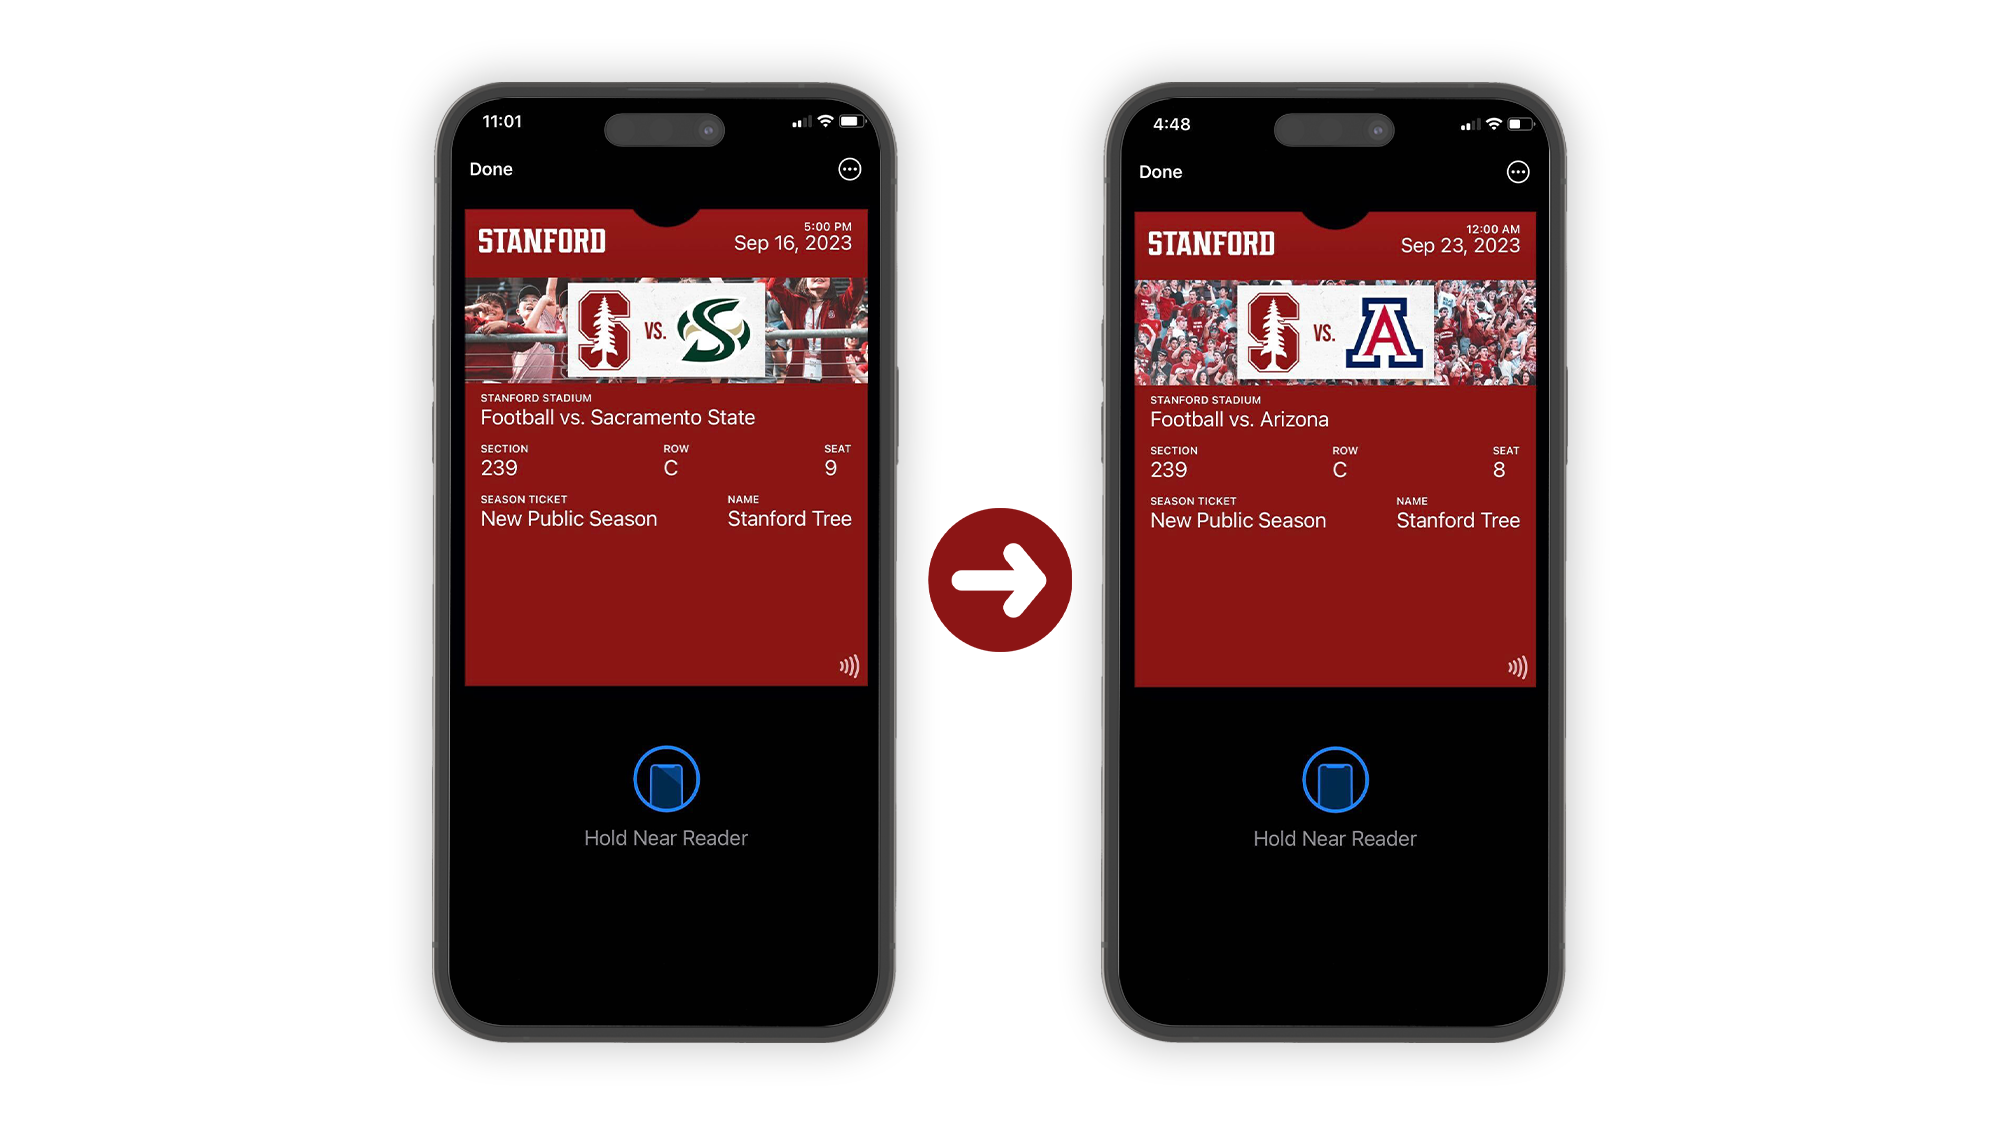
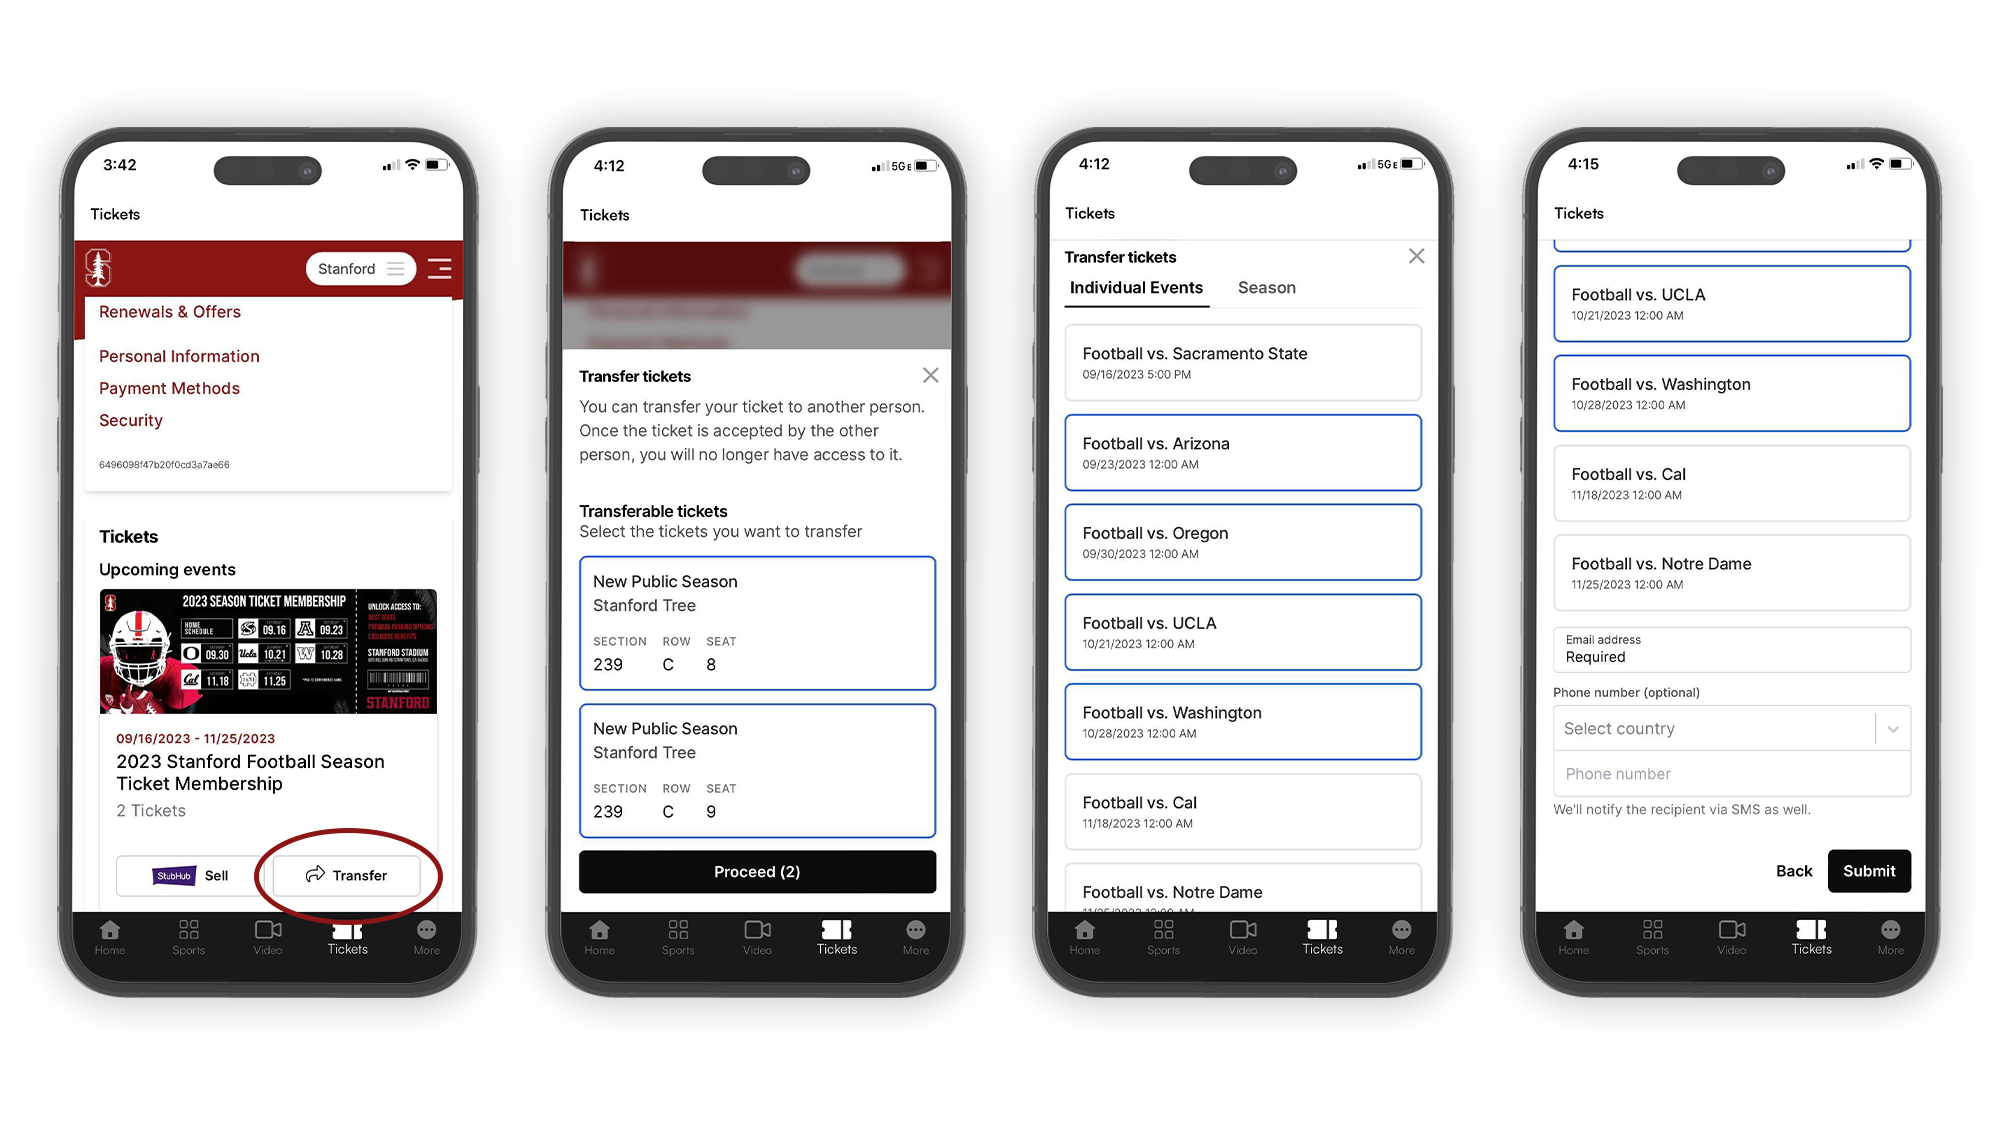
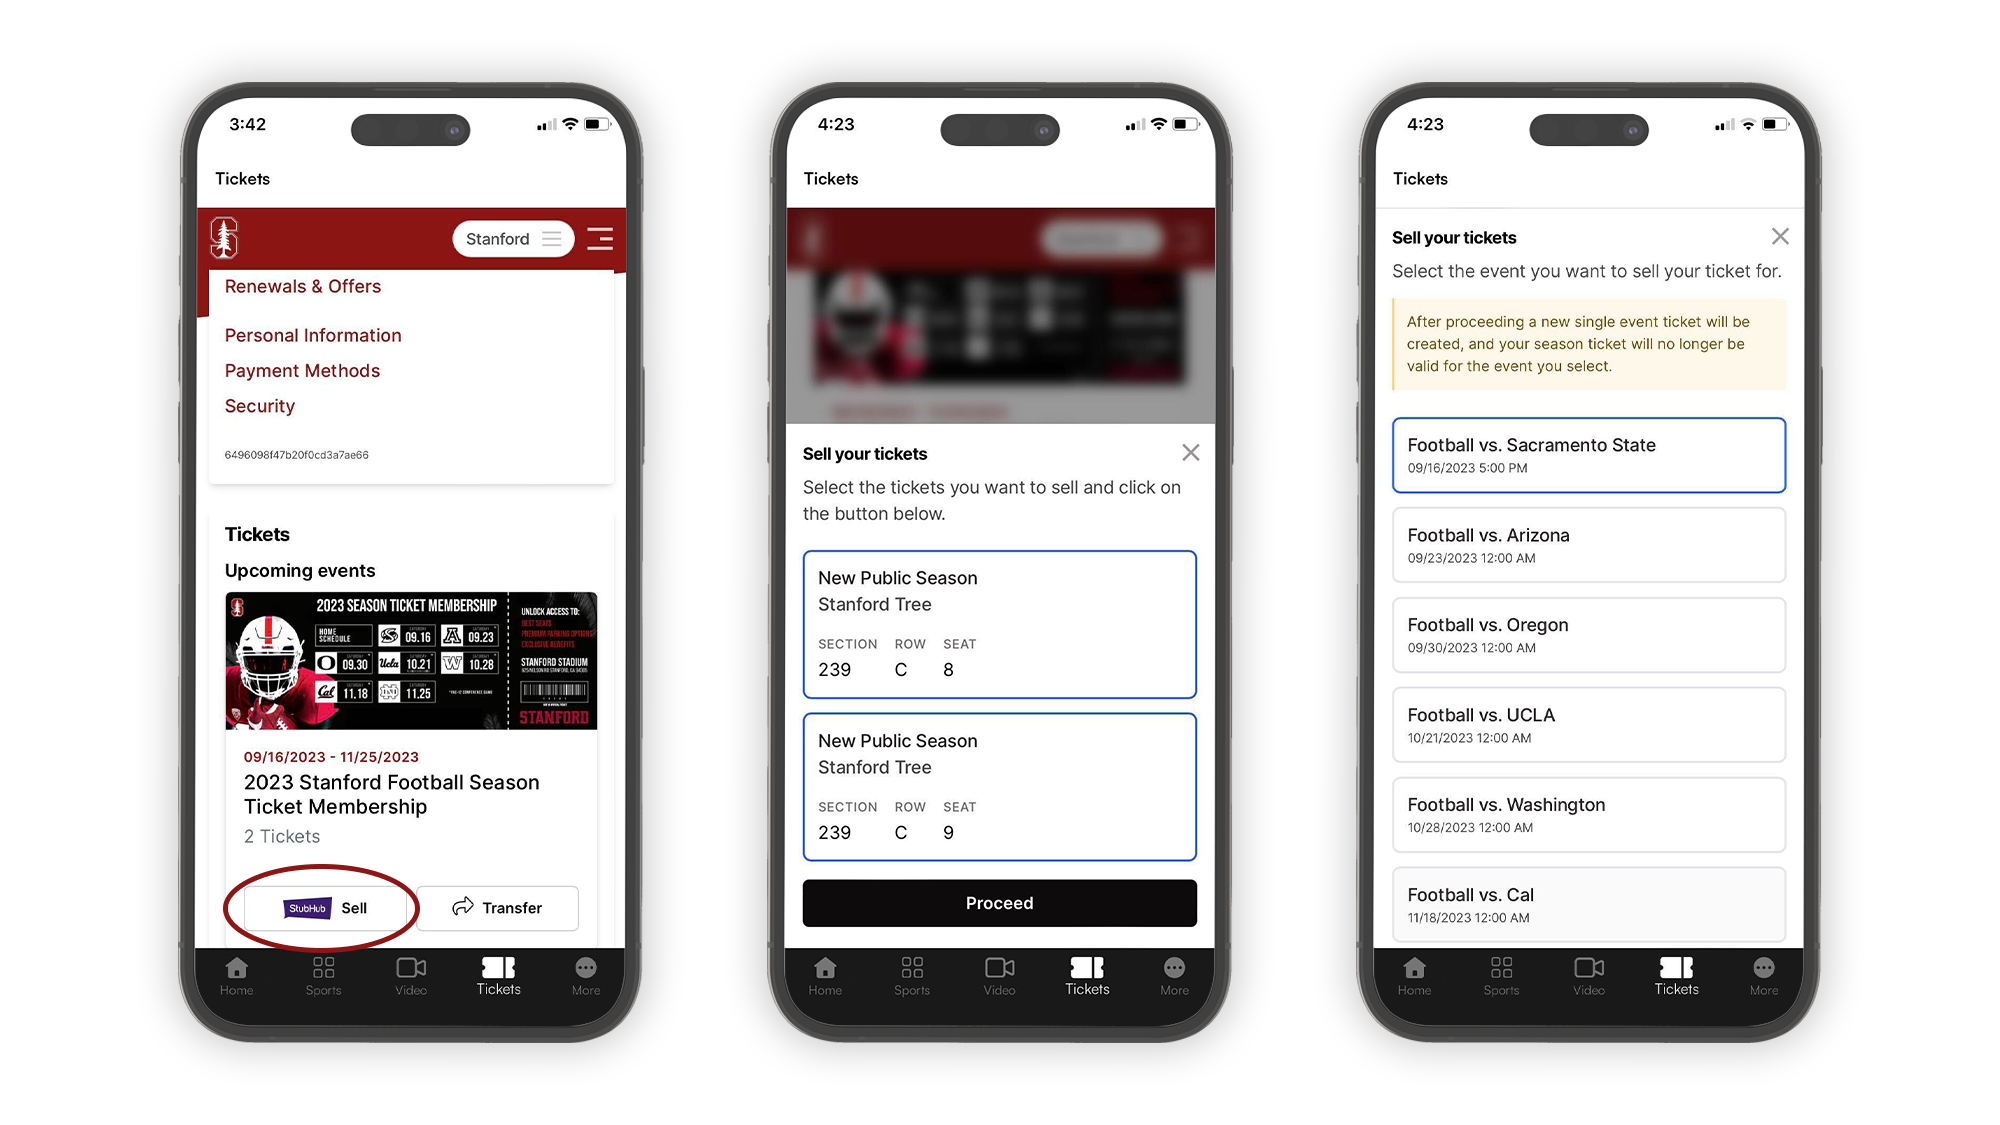
Mobile tickets and parking passes have been the primary ticket delivery method for all ticketed Stanford athletic events since 2021. In an effort to further modernize and advance the ticketing experience for fans, Stanford Athletics changed ticketing system providers and unveiled the redesigned Stanford Cardinal mobile app on July 1, 2023. These technology advancements have brought a refreshed ticket website and ticket purchase flow at tickets.gostanford.com, streamlined mobile ticket downloads with season ticket passes, expedited venue entry, and much more.

Please review the resources below for assistance and step-by-step instructions to help you find, manage and use your mobile tickets for Stanford athletic events. If you would like personalized assistance, our dedicated Account Executives are available Monday - Friday, 9 A.M. to 3 P.M. at (800)-STANFORD, or athleticstickets@stanford.edu.

How-to Guide

In the "Tickets" section of your online account, all of your available tickets will be grouped into event tiles. On these event tiles are action buttons to store and manage multiple tickets.

All season tickets/parking will appear as a single event tile and can be stored as one pass per seat (more details in the ‘How do season ticket passes work?’ section below). The action buttons on season event tiles will give you the option to select specific tickets and events from the season. We recommend using these buttons instead of opening and managing individual tickets.

If you do need to access and store an individual ticket on your account, follow the steps below.

  1. Select the event you’re attending to view individual tickets.
  2. After selecting an event, you can view and manage additional tickets by scrolling from right to left.
  3. Choose “Add to Wallet” on the ticket(s) you want to store.
  4. Tap “Add” in the top right corner to securely store your ticket in your mobile wallet.

All mobile tickets will be ‘Tap and Go’ tickets and will not have barcodes. Please review the “Where is the QR code on my ticket?” section below for further information. Screenshots will not be accepted for entry.

Note for fans with Android devices: If the "Add to Google Wallet" button does not appear on your ticket tile when viewed on your smartphone, please try the "Add to Apple Wallet" button to store your ticket(s) in your Google Wallet.

Instead of a barcode or QR code, your mobile tickets will prompt you to hover your smartphone near the ticket scanner to scan into events. When you arrive at the venue, open your mobile wallet, navigate to your tickets for the event and hold your device near the ticket scanner to scan in to the event. If you have multiple tickets in your mobile wallet, you can scroll horizontally to display and scan additional tickets. 

If you have paid for groceries or gas by tapping your credit card or phone on a credit card reader, you have experienced this “Tap and Go” technology.

You should download your mobile tickets as soon as possible after completing your purchase and prior to arriving at the event. Tickets stored in your mobile wallet will automatically update when game times are set, can be easily opened from your device’s home screen on the day of the event, and do not require Wi-Fi or cellular service to be accessed. Screenshots will not be accepted for entry.

Note for fans with Android devices: Please be sure that NFC is enabled on your device prior to arriving at the event. If your device does not have NFC capabilities, a QR code should display on your wallet ticket when tapping the "Show Code" option.

Season Ticket Members (STMs) no longer have to download each individual ticket or parking pass for every game of the season! With the new season ticket pass, STMs will only download one mobile wallet pass per season ticket or parking pass to use for entry into each game throughout the season.

  • When a STM adds a season ticket pass to their mobile wallet, they will only see the event details for the first game of the season.
  • The season ticket pass will automatically update to the next available game when used, transferred, or sold on StubHub. No additional action is needed!

For example, Stanford Tree adds their football season ticket pass for seat 9, which has the event details for the football home opener against TCU. They decide to transfer that ticket to their friend, Axel. When Axel accepts the ticket transfer, the TCU game is removed from Stanford Tree’s season ticket pass for seat 9 and it automatically updates to the Cal Poly game.

  1. Select “Transfer” on the event you would like to transfer. Note: All season tickets/parking will appear as a single event tile. Multiple seats and games can be easily transferred at once with the following steps.
  2. Select the seat(s) you want to transfer and tap “Proceed.”
  3. Select the game(s) you want to transfer.
  4. Enter the email address of the person to whom you would like to transfer ticket(s).
  5. Tap “Submit” to initiate the transfer.*


*Once your transfer has been sent, the recipient will receive an email with a link to accept the transfer. They will not be required to create an account. You may cancel the transfer at any time until it is accepted.

  1. Select “Sell” on the event you would like to list for sale. Note: All season tickets/parking will appear as a single event tile. You can list a single game out of one of these packages by following these steps.
  2. Select the seat(s) you want to sell and tap “Proceed.”
  3. Select the game you want to sell and tap “Sell."
  4. Sign in to your StubHub account or create a new StubHub account.
  5. Set your desired price per ticket, choose your preferred payout method, accept the terms and conditions, and click “Create Listing.”

As an event approaches, fans may want to explore options to upgrade their seats. If upgrading your tickets is allowed, an "Upgrade" action button will be displayed on the event and ticket tile. Follow the instructions below to upgrade your tickets.

  1.  On the event tile in the "Tickets" section of your online account, select the "Upgrade" action button.
  2. Select the seats you want to upgrade then proceed. By selecting seats at this step, you are giving yourself the option to upgrade them, but are not yet committing to anything.
  3. For Season Ticket Members, select the event for which you want to upgrade. This step will be bypassed for fans upgrading single game tickets.
  4. On the "Review selection" screen, you will have the ability to preview available seating options on the interactive map and confirm which of your existing ticket(s) you want to upgrade in the list on the right-hand side of the page. The seats you select in this step will only be released for sale once your complete the entire checkout process.
  5. Once you have confirmed which of your existing seats you want to change, click "Upgrade." Please note that your selected tickets will be placed in an active checkout and will not be manageable for 20 minutes unless you click "Cancel order" in the checkout window. 
  6. Select new seats on the map. The value of your selected ticket(s) in Steps 4 and 5 will be converted into an "Upgrade Credit" in your shopping cart and applied towards your total. Once you are done selecting new seats, click "Proceed" to continue. Do not use your browser's back button or close the window without clicking "Cancel order" otherwise your tickets will be inaccessible until your shopping cart expires after 20 minutes.
  7. Complete all required fields on the "Your details" page and click "Proceed to payment." You will not be able to edit the email address fields.
  8. Submit payment details and click "Pay" to complete the checkout process. Note: Once complete, the seats you selected to upgrade will be released and made available to other fans. If you need to make any changes to ensure you keep all desired seats, please click the arrow at the top of the screen next to the event name to return to the “Your details” step, then click the arrow again and click “OK” to cancel the checkout and start over at Step 1.
  1. Sign in and go to the “Tickets” section of your online account.
  2. On the event tile for your season tickets, click the “Upgrade” button.
  3. Select the ticket(s) you want to upgrade and click “Proceed.” By selecting seats at this step, you are giving yourself the option to upgrade them, but are not yet committing to anything.
  4. Click the red “Select” button on the season tickets event tile and then “Proceed.”
  5. Please read the following carefully. Preview available seating options on the interactive map and confirm which of your existing ticket(s) you want to upgrade in the list on the right-hand side of the “Review selection” page. The seats you select in this step will be released for sale once you complete the checkout process. Once you have confirmed which of your existing seats you want to change, click “Upgrade.” Please note that your selected tickets will be placed in an active checkout and will not be manageable for 20 minutes unless you click “Cancel order” in the checkout window. Note: If you want to keep all of your seats and only add-on new seats, make sure all of your seats are unselected and then click “ Buy New Tickets.”
  6. Enter your personal promo code that was emailed to you by the Stanford Athletics Ticket Office. Note: Your promo code is associated with your account and cannot be shared. It will not unlock the upgrade process until your designated selection time.

MTG 2.png

  1. Select new seats on the map. The value of your selected ticket(s) in Step 5 will be converted into an “Upgrade Credit” in your shopping cart and applied towards your total. Once you are done selecting new seats, click “Proceed” to continue. Note A: Do not use your browser’s back button or close the window without clicking “Cancel order” otherwise your tickets selected in Step 5 will be inaccessible until your checkout cart expires after 20 minutes. Note B: Priority seat contributions are required in addition to the list ticket price in select areas. The contribution requirement will be listed in the ticket type description you select. You will be contacted and invoiced by the Stanford Athletics Ticket Office for any incremental priority seat contributions that you owe for your new seats. Note C: STMs who choose to downgrade seats or do not utilize the full amount of their upgrade credit will not receive a refund or account credit. Please be sure to use all of your upgrade credit prior to completing the checkout.MTG 3.png
  2. Complete all required fields on the “Your details” page and click “Proceed to payment.” You will not be able to edit the email address fields.
  3. Submit payment details and click “Pay” to complete the checkout process. Note: Once complete, the seats you selected to upgrade will be released and made available to other fans. If you need to make any changes to ensure you keep all desired seats, please click the arrow at the top of the screen next to the season ticket event name to return to the “Your details” step, then click the arrow again and click “OK” to cancel the checkout and start over at Step 1.MTG 4.png

Stanford Athletics works with a number of Bay Area nonprofit organizations to provide admission to community members using unsold seating inventory. Since this outreach requires advance planning and grouped seating, the tickets that were donated back to Stanford Athletics in previous years were difficult to utilize. Beginning with the 2023-24 academic year, the Stanford Athletics Ticket Office stopped accepting ticket donations, but has teamed up with the Veteran Tickets Foundation (Vet Tix) to provide an option for Season Ticket Members (STMs) to donate tickets to active military, veterans, and first responders. To donate, transfer your tickets to donate@vettix.org.

STMs may also work directly with the charity of their choice to donate tickets.